GraphQL
GraphQL是Facebook开发的一种数据查询语言,它于2015年公开发布。
GraphQL API的出现是为了解决传统RESTful API在某些场景下的一些限制和挑战。
下面是一些导致GraphQL API出现的主要原因:
- 减少多次请求:传统的RESTful API一次请求只能返回一个资源,而GraphQL API一次可以返回多个资源,因此可以减少多次请求的次数。
- 避免过度获取和欠获取:传统的RESTful API通常以预定义的数据结构返回数据,导致客户端要么获取了过多的数据,要么获取了不足的数据。GraphQL API通过让客户端指定所需的数据结构,避免了这种问题,客户端可以精确地获取所需的字段和关联数据,避免了数据的浪费和不足。
由于restful api预定义好了每个接口的返回的数据,所以即使我只想要用户的name,却还是会返回用户的整个字段内容给我。而graphql查询,如果我只要用户的name,那么就只会返回name给我,不会返回整个用户字段给到用户,避免了数据的过度获取。
graphql是一种数据查询语言,GraphQL的API通常是一个URL对应多种查询,不同的查询是通过请求体来区分的。
Hello World
运行 GraphQL API 服务器的最简单方法是使用 Express
- 初始化一个project
npm init -y -
安装依赖
1
 npm install express graphql-http graphql --save
-
搭建一个express server
1 2 3 4 5 6 7 8
var express = require('express'); var app = express(); app.use(express.static('public')); app.listen(3001, ()=>{ console.log('Server running on port 3001'); }) -
添加graphQL
1
2
 var { buildSchema } = require('graphql');
 const { createHandler } = require('graphql-http/lib/use/express');
在 GraphQL 中,schema 定义了客户端可以查询的数据类型以及它们之间的关系。使用 buildSchema 函数可以创建 schema 对象。这个 schema 对象可以被传递给 GraphQL 的执行器,以便它可以执行来自客户端的查询,并返回所需的数据。
1
2
3
4
5
6
7
 // Construct a schema, using Graphql schema language. 1
 // The parameter of buildSchema function is a String type. 2
 var schema = buildSchema(`
     type Query {
         hello : String!
     }
 `);
这段schema 定义了所有可能的类型和操作,并且充当客户端和服务器之间的契约。注意,buildSchema方法的参数这里使用的是反引号. 在这个 schema 中,我们定义了一个类型:
Query
Query类型是 GraphQL schema 中的预定义类型。其中定义了一些查询操作(方法),客户端可以使用这些操作从服务器中检索数据。
在Query类型中,我们定义了一个字段:hello。hello字段是一个字符串类型,它的值为String!,表示这是一个非空的字符串类型。
在实际应用中,我们需要提供一个名为hello的函数,用于处理查询操作。1 2 3 4 5 6
//The root provide a resolver function for each API endpoint 1 var root = { hello: () => { return 'hello world'; } };在 GraphQL 中,root 对象是一个用于处理客户端请求的实际对象(根对象),它包含了所有的处理函数。hello 方法是箭头函数的表示方式,返回一个字符串 ‘hello world’,这个方法用于处理 hello 查询操作。在GraphQL 中,查询操作是客户端用于从服务器检索数据的一种方式。
1 2 3 4 5 6 7 8
// Create and use the GraphQL handler. app.all( '/graphql', createHandler({ schema: schema, rootValue: root, }), ); -
在public文件夹下创建一个客户端index.html
1 2 3 4 5 6 7 8 9 10 11 12 13 14 15 16 17 18 19 20 21 22 23 24 25 26 27 28 29 30 31 32 33 34 35 36 37 38 39 40
<!DOCTYPE html> <html lang="en"> <head> <meta charset="UTF-8"> <meta name="viewport" content="width=device-width, initial-scale=1.0"> <title>Document</title> </head> <body> <button onclick="getdata()">获取数据</button> <div id="result" style="margin-top:20px;"></div> <script> function getdata() { const query = `query{ hello }`; fetch('http://localhost:3001/graphql', { method: 'POST', headers: { 'Content-Type': 'application/json', 'Accept': 'application/json' }, body: JSON.stringify({ query: query }) }) .then(res => res.json()) .then(data => { // Display the result in the page const resultDiv = document.getElementById('result'); if (data) { resultDiv.textContent = "返回数据: " + JSON.stringify(data, null, 2); } }) .catch(err => { document.getElementById('result').textContent = '请求失败: ' + err; }); } </script> </body> </html> -
使用以下命令运行此 GraphQL 服务器:
1
 node index.js
此时,你将有一个正在运行的 GraphQL API
打开浏览器访问http://localhost:3001,点击按钮,可以看到返回Hello World数据 -
自己写一个客户端测试graphql太麻烦了,我们需要一个现成的 GraphQL 客户端来向 API 发出 GraphQL 查询。官方提供的方法是使用
ruru包,该包捆绑了预构建的 GraphiQL 和一些流行的增强功能。 为此,请安装模块1
npm install --save ruru
然后将以下内容添加到文件中,然后重新启动命令:node index.js
1
2
3
4
5
6
7
 const { ruruHTML } = require('ruru/server');

 // Serve the GraphiQL IDE.
 app.get('/', (_req, res) => {
     res.type('html');
     res.end(ruruHTML({ endpoint: '/graphql' }));
 });
导航到 http://localhost:3001,应该会看到一个允许您输入查询的界面。 在左侧输入
1
2
3
 {
     hello
 }
点击Execute Query, 可以看到右侧返回
1
2
3
4
5
 {
     "data": {
         "hello": "hello world"
     }
 }
数据类型
- 基本数据类型:
String,Int,Float,Boolean,ID(ID类型的本质是字符串类型,但是如果是ID类型就表示数据不能重复,但是GraphQL本身并没有内置的机制来强制确保ID类型的数据不重复,需要协同数据库共同控制),这几个类型都可以在schema声明的时候直接使用。 [类型]代表数组,例如[Int]代表整数数组。
默认情况下,每个类型都是可为 null 的 - 返回任何类型都是合法的。使用感叹号表示类型不能为空,不可为空的字符串string!
自定义数据类型
GraphQL中除了几种基本的数据类型,有两种预定义的数据类型,一种是Query,另一种是Mutation。
如果用户想自定义其它数据类型,则可以在buildSchema方法中通过type定义其它类型,例如我们想定义一个User类型和Post(博客)类型。
1
2
3
4
5
6
7
8
9
10
11
12
13
14
15
16
17
18
19
20
21
22
23
24
25
26
27
28
29
30
31
32
33
34
35
36
37
38
39
40
var schema = buildSchema(`
    type User {
        id: ID!
        name: String!
        posts: [ID!]
    }
    type Post {
        id: ID!
        title: String!
        content: String!
        author: ID!
    }
    type Query {
        hello : String!
        getUser: User!
        getPost: Post!
    }
`);


var root = {
    hello: () => {
        return 'hello world';
    },
    getUser() {
        return {
            id: '1',
            name: 'John Doe',
            posts: ['1', '2']
        };
    },
    getPost() {
        return {
            id: '1',
            title: 'Post Title',
            content: 'Post Content',
            author: '1'
        };
    }
};
在getUser和getPost方法的具体实现中,都需要返回对应的自定义数据类型,我们的返回值是字典类型,可以返回比期望的数据类型更多的键值对,因为graphQL只会匹配和期望的数据类型中相同的字段。但是不能更少(不会报错),但是这样在查询的时候对应被遗漏的字段的值就为null了,如果恰好被遗漏的字段的值不能为null,又恰好去查询了这个字段的值,那么查询就会报错。
由于getUser方法和getPost方法的返回类型都是自定义类型,在调用的时候我们必须使用{}来指定我们希望服务器端返回给我们哪几个字段的值
1
2
3
4
5
6
7
8
9
10
{
    getUser{
        id
        name
    }
    getPost{
        id
        title
    }
}
返回数据
1
2
3
4
5
6
7
8
9
10
11
12
{
    "data": {
        "getUser": {
            "id": "1",
            "name": "John Doe"
        },
        "getPost": {
            "id": "1",
            "title": "Post Title"
        }
    }
}
参数传递
和js传递参数一样,在小括号内定义行参,但是参数需要在schema中定义类型。
graphQL请求参数,参数的值如果是String,必须使用双引号,使用单引号会报错。
1
2
3
4
5
6
7
8
9
10
11
12
13
14
15
16
17
18
19
20
21
22
23
type Query {
    getUserById(id:ID!): User!
    getPostById(id: ID!): Post!
}

getUserById({id}){
    var User1={id:'001',name:'Alice',posts:['11','12']}
    var User2={id:'002',name:'Mary',posts:['13','14']}
    if(User1.id === id){
        return User1
    } else {
        return User2;
    }
},
getPostById({id}){
    var Post1={id:'1',title:'What is API',content:'API is an interface ..', author:'1'}
    var Post2={id:'1',title:'What is GraphQL',content:'GraphQL is an langu...', author:'1'}
    if(Post1.id === id){
        return Post1
    } else {
        return Post2;
    }
}
发出以下请求
1
2
3
4
5
6
7
{
    getUserById(id:"001"){
        id
        name
        posts
    }
}
得到的结果
1
2
3
4
5
6
7
8
9
10
11
12
{
    "data": {
        "getUserById": {
            "id": "001",
            "name": "Alice",
            "posts": [
                "11",
                "12"
            ]
        }
    }
}
query和mutation
在GraphQL中,Query和Mutation是两种特殊的根操作类型,都是预定义好的,用于定义可执行的查询和变更操作。
Query类型:
Query类型用于定义可以执行的读取操作。它表示你可以从服务器获取数据的能力。在前面我们一直是查询操作,所以我们所有查询操作的定义其实都写在Query type下面。
1
2
3
4
type Query {
    getUser(id: ID!): User!
    getPost(id: ID!): Post!
}
Mutation类型:
Mutation类型用于定义可以执行的写入或修改操作。它表示你可以向服务器发送请求以更改数据的能力。通常,Mutation`类型中的字段对应于可以对服务器上的数据进行修改的操作。
假设目前我们需要创建一条Account数据。我们可以和之前一样使用type自定义Account数据类型:
1
2
3
4
5
6
type Account {
    id: ID!   # 服务端生成,不需要输入
    name: String
    age: Int
    salary(city: String): Int
}
但是使用type定义出来的数据类型只能作为查询类型,却不能作为请求的输入类型。所以我们还需要使用input定义输入类型AccountInput作为请求的输入参数:
1
2
3
4
5
input AccountInput {
    name: String   # 只传真正需要的字段
    age: Int
    city: String
}
这是 GraphQL 类型系统的刻意设计, 这种分离实际上强制你思考哪些字段是客户端应该提供的,哪些是服务端负责的。
接下来我们定义mutation类型以及其createAccount操作,createAccount的输入参数是AccountInput类型:
1
2
3
type Mutation {
    createAccount(input: AccountInput): Account
}
注意,由于如果只有Mutation类型而没有Query类型的话,graphQL不支持,所以我们再添加一个Query类型:
1
2
3
type Query {
    getAccount(id: ID!): Account
}
完整代码:
1
2
3
4
5
6
7
8
9
10
11
12
13
14
15
16
17
18
19
20
21
22
23
24
25
26
27
28
29
30
31
32
33
34
35
36
37
38
39
40
41
42
43
44
45
46
47
var schema = buildSchema(`
    type Account {
        id: ID!
        name: String
        age: Int
        salary(city: String): Int
    }
    input AccountInput {
        name: String
        age: Int
        city: String
    }
    type Query {
        getAccount(id: ID!): Account
    }
    type Mutation {
        createAccount(input: AccountInput): Account
    }
`);

var root = {
    createAccount({ input }) {
        const name = input.name;
        const age = input.age;
        // salary is a field resolver, not a direct value
        return {
            id: "001",
            name,
            age,
            salary: ({ city }) => (city === 'Shenzhen' ? 2000 : 1000)
        };
    },
    getAccount({ id }) {
        let name = '';
        let age = null;
        if (id === '001') {
            name = 'Tom';
            age = 29;
        }
        return {
            id,
            name,
            age,
            salary: ({ city }) => (city === 'Shenzhen' ? 2000 : 1000)
        };
    }
};
输入以下查询
1
2
3
4
5
6
7
8
mutation{
    createAccount(input:{name:"xx1", age:18, city:"Shenzhen"}){
        id
        name
        age
        salary(city:"Shenzhen")
    }
}
得到的结果
1
2
3
4
5
6
7
8
9
10
{
    "data": {
        "createAccount": {
        "id": "001",
        "name": "xx1",
        "age": 18,
        "salary": 2000
        }
    }
}
Apollo
GraphQL 和 Apollo 是规范与实现的关系。GraphQL 是一种查询语言规范, 它只定义了:
- 查询语法(query、mutation、subscription)
- Schema 定义语言(type、input、interface 等)
- 执行规则
规范本身不是代码,需要具体的库来实现它。
Apollo 是目前最流行的 GraphQL 生态工具集,提供了规范的完整实现。
Apollo Server
我们从之前的案例里面可以看出来,启动的graphql服务是建立在express基础上的。
下面我们建立一个apollo-server对比看看
-
创建项目并初始化
1
2
3
4
5
 mkdir apollo
 cd apollo
 npm init -y
 //顺便把package.json里面的type修改成module模式,支持esModule
 npm pkg set type="module"
-
安装依赖
1
 npm install @apollo/server graphql
-
创建graphql服务
1 2 3 4 5 6 7 8 9 10 11 12 13 14 15 16 17 18 19 20 21 22
import { ApolloServer } from "@apollo/server"; import { startStandaloneServer } from "@apollo/server/standalone"; const typeDefs = ` type Query { hello: String } `; const resolvers = { Query: { hello: () => "Hello, world!", }, }; const server = new ApolloServer({ typeDefs, resolvers }); startStandaloneServer(server, { listen: { port: 4000 }, }).then(({ url }) => { console.log(`🚀 Server ready at: ${url}`); }); - 启动服务
node index.js - 访问下
http://localhost:4000/就会进入这个页面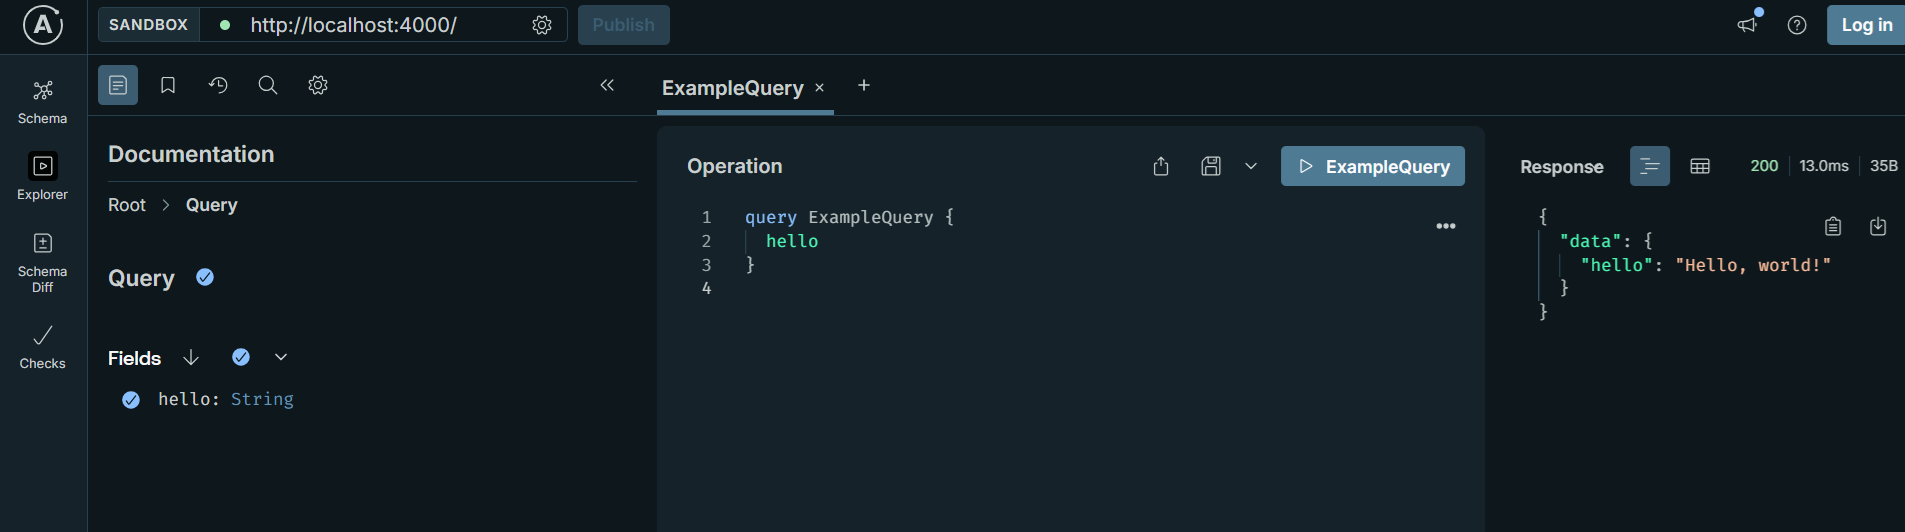 它是一个
它是一个graphQL可视化页面。这个可视化页面极大方便了我们写graphQL。
以下是代码对比

plugins
ApolloServerPluginDrainHttpServer
ApolloServerPluginDrainHttpServer 是 Apollo Server 提供的一个插件,用于在关闭 Node.js HTTP 服务器时,优雅地关闭(drain)与 Apollo Server 相关的连接和资源。
主要作用:
当你调用 httpServer.close() 或应用进程退出时,确保所有正在进行的 GraphQL 请求和订阅都能被正确处理和关闭。
防止服务器“强制”关闭导致的请求丢失或连接异常。
常用于集成 WebSocket(如 graphql-ws)和 HTTP 服务的场景,保证 HTTP 和 WebSocket 都能优雅关闭。
用法示例:
1
2
3
4
5
6
7
8
9
10
11
import { ApolloServer } from '@apollo/server';
import { ApolloServerPluginDrainHttpServer } from '@apollo/server/plugin/drainHttpServer';
import http from 'http';

const httpServer = http.createServer(app);
const server = new ApolloServer({
    schema,
    plugins: [
        ApolloServerPluginDrainHttpServer({ httpServer }),
    ],
});
Apollo Client
之前的express+graphql启动的服务,我用前端访问接口的时候,直接用的html文件,使用fetch去访问graphQL服务。
现在 appolo-client 集成了react。
-
初始化项目, 利用vite创建一个react项目
1
 npm create vite@latest
选择react, javascript based
-
安装依赖
1
 npm install @apollo/client graphql rxjs
-
在
main.jsx文件集成apollo-client, 我们在上面apollo-server里面已经创建了一个graphql服务,现在就启动它,然后在main文件里面使用它1 2 3 4 5 6 7 8 9 10 11 12 13 14 15 16
import { ApolloClient, HttpLink, InMemoryCache, gql} from "@apollo/client"; import { ApolloProvider } from "@apollo/client/react"; const client = new ApolloClient({ link: new HttpLink({ uri: "http://localhost:4000/" }), cache: new InMemoryCache(), }); // Supported in React 18+ const root = ReactDOM.createRoot(document.getElementById("root")); root.render( <ApolloProvider client={client}> <App /> </ApolloProvider> ); -
在组件里面使用, 在
app.jsx里面1 2 3 4 5 6 7 8 9 10 11 12 13 14 15 16 17 18 19 20
// Import everything needed to use the `useQuery` hook import { gql } from "@apollo/client"; import { useQuery } from "@apollo/client/react"; const Query_Hello = gql` query { hello } `; export default function App() { const { loading, error, data } = useQuery(Query_Hello); if (loading) return <p>Loading...</p>; if (error) return <p>Error : {error.message}</p>; return ( <div>Get data from graphQL: {data.hello}</div> ); }Query_Hello就是grqphql的gql语句,用来获取数据,以前获取数据都用的是fetch请求,现在不用了,直接一个hooks就解决了,更加方便
apollo-client将graphql服务地址集中管理,将获取到的数据集中由context管理,按照 ContextApi的方式将所有的值在父组件里面传递出去。在子组件里面,使用useQuery和useLazyQuery配合 gql 获取数据。
GraphQL In TypeScript: TypeGraphQL
TypeGraphQL 是一个基于 TypeScript 的库,用于构建 GraphQL API。它利用 TypeScript 的类型系统和装饰器语法,使得定义 GraphQL schema 和 resolver 更加直观和类型安全。
1
2
3
4
5
6
7
8
9
10
11
12
13
14
@ObjectType()
export class User {
    @Field(()=>Int)
    id: number;

    @Field()
    firstName: string;

    @Field()
    lastName: string;

    @Field(()=>Int)
    age: number;
}
-
初始化一个project
1
 npm init -y
-
安装依赖
1
2
 npm install type-graphql apollo-server reflect-metadata graphql
 npm install typescript ts-node @types/node --save-dev
注意:
apollo-server包已被废弃,官方推荐迁移至@apollo/server(Apollo Server v4)。此处示例仍使用apollo-serverv3,如需使用最新版本请参考 Apollo Server 官方文档。 -
配置TypeScript
tscofnig.json1 2
"experimentalDecorators": true, "emitDecoratorMetadata": true
-
使用 TypeGraphQL 定义 GraphQL 类型。创建一个简单的
User类型。1 2 3 4 5 6 7 8 9 10 11 12 13 14 15 16 17
// src/types/user.ts import { Field, Int, ObjectType } from "type-graphql"; @ObjectType() export class User { @Field(()=>Int) id!: number; @Field() firstName!: string; @Field() lastName!: string; @Field(()=>Int) age!: number; } -
创建一个
UserResolver来处理用户相关的 GraphQL 查询。1 2 3 4 5 6 7 8 9 10 11 12 13 14 15 16 17 18 19 20 21 22 23 24 25 26 27 28 29 30 31 32 33 34 35 36 37
// src/resolvers/userResolver.ts import { Query, Resolver, Arg, Mutation,Int} from "type-graphql"; import { User } from "../types/user"; @Resolver() export class UserResolver{ private users: User[] = [ {id:1, firstName:"John", lastName:"Doe", age:25}, {id:2, firstName:"Jane", lastName:"Smith", age:30} ]; @Query(() => [User]) getUsers(): User[]{ return this.users; } @Query(() => User, {nullable:true}) getUser(@Arg("id", () => Int) id: number): User | undefined{ return this.users.find(user => user.id === id); } @Mutation(() => User) createUser( @Arg("firstName") firstName: string, @Arg("lastName") lastName: string, @Arg("age", () => Int) age: number ): User{ const newUser: User = { id: this.users.length + 1, firstName, lastName, age }; this.users.push(newUser); return newUser; } } -
使用
Apollo Server来设置 GraphQL API 服务。1 2 3 4 5 6 7 8 9 10 11 12 13 14 15 16 17 18
import "reflect-metadata"; import { ApolloServer } from "apollo-server"; import { buildSchema } from "type-graphql"; import { UserResolver } from "./resolvers/userResolver"; async function bootstrap(){ const schema = await buildSchema({ resolvers: [UserResolver], }); const server = new ApolloServer({ schema }); server.listen(4000, () => { console.log("Server is running on http://localhost:4000/graphql"); }); } bootstrap(); -
在package.json中添加新的Command
1
 "dev": "ts-node src/index.ts"
-
运行命令
npm run dev, 访问http://localhost:4000,可以看到GraphQL Sandbox界面
以下是代码对比, 虽然看起来TypeGraphQL更加复杂了,但它对schema和resolver进行了类型强制检查,有利于代码的维护。

TypeGraphQL在Github里提供了很多实例。Github
graphql-ws
graphql-ws 是一个用于在 GraphQL 中实现 WebSocket 实时订阅(subscriptions)的现代协议和库。
主要作用:
- 让前端和后端通过 WebSocket 实现 GraphQL 的实时数据推送(如订阅消息、实时更新)。
- 替代旧的
subscriptions-transport-ws,更现代、规范、兼容性更好。 - 支持 Node.js、浏览器等多种环境。
具体guide可以看官方文档:
GraphQL-WebSocket
Apollo Angular
Apollo提供了Apollo Client在Angular端的实现。
-
生成一个Angular project
1
 ng new client
-
安装必要依赖
1
 npm i apollo-angular @apollo/client graphql
-
检查tsconfig.json, @apollo/client要求ES2020或更高版本:
1 2 3 4 5 6
{ "compilerOptions": { // ... "lib": ["es2020", "dom"], }, } -
更新app.config.ts, 添加
provideHttpClient和provideApollo1 2 3 4 5 6 7 8 9 10 11 12 13 14 15 16 17 18 19 20 21 22 23
import { ApplicationConfig, inject, provideZoneChangeDetection } from '@angular/core'; import { provideRouter } from '@angular/router'; import { routes } from './app.routes'; import { provideApollo } from 'apollo-angular'; import { HttpLink } from 'apollo-angular/http'; import { InMemoryCache } from '@apollo/client'; import { provideHttpClient } from '@angular/common/http'; export const appConfig: ApplicationConfig = { providers: [ provideZoneChangeDetection({ eventCoalescing: true }), provideRouter(routes), provideHttpClient(), provideApollo(() => { const httpLink = inject(HttpLink); return { link: httpLink.create({ uri: 'http://localhost:4000/graphql' }), cache: new InMemoryCache(), } }) ] };通过
HttpLink服务,将client与GraphQL Server联系起来。这段代码跟React里的很像。 -
在
app.component.ts里Query数据1 2 3 4 5 6 7 8 9 10 11 12 13 14 15 16 17 18 19 20 21 22 23
export class AppComponent implements OnInit { title = 'client'; data: any; loading = true; error: any; constructor(private readonly apollo: Apollo) {} ngOnInit(): void { this.apollo.watchQuery({ query: gql` { hello } ` }) .valueChanges.subscribe((result: any) => { this.data = result.data; this.loading = result.loading; this.error = result.error; }); } }Apollo是一个由 apollo-angular 导出的 Angular 服务,用于在 UI 中共享 GraphQL 数据。
首先,使用gql函数包装GraphQL 查询语句,将其传递给 Apollo.watchQuery 方法的 query 属性。
watchQuery 方法会返回一个QueryRef对象,该对象具有一个valueChanges属性,它本身是一个 Observable。
通过 Observable 传递的对象包含loading、error和data属性。Apollo Client 会自动跟踪错误和加载状态,这些状态会反映在 loading 和 error 属性中。一旦查询结果返回,它将附加在 data 属性上。 -
修改
app.component.html,在页面上显示data1 2 3 4 5 6 7 8 9 10
@if (loading) { <div>Loading...</div> } @if (error) { <div>Error :(</div> } @if (data) { Get New Data from Apollo GraphQL: <p></p> } -
运行我们之前生成的Apollo Server,
npm run start运行client
CodeGen
GraphQL Code Generator 是一个插件,旨在帮助我们充分发挥 GraphQL 技术栈的优势。
它可以自动生成以下内容,从后端到前端:
- 用于 React、Vue、Angular、Next.js、Svelte 的类型化查询(Queries)、变更(Mutations)和订阅(Subscriptions),支持 Apollo Client、URQL 或 React Query。
- 用于 Node.js(如 GraphQL Yoga、GraphQL Modules、TypeGraphQL 或 Apollo)或 Java GraphQL 服务器的类型化解析器(Resolvers)。
- 完全类型化的 Node.js SDK、Apollo Android 支持等。
我们以以下 TypeGraphQL章节中的 schema 为例:
1
2
3
4
5
6
7
type Hello {
    result!: string;
}

type SayHelloQuery {
    sayHello: Hello
}
在没有 GraphQL Code Generator 的情况下,前端通常会这样查询 API:
1
2
3
4
5
6
7
8
9
10
11
const GET_POSTS = gql`
    query SayHello {
        sayHello {
            result
        }
    }
`

interface Hello {
    result: string
}
手动维护类型或缺少类型会带来很多问题:
- 类型与当前 Schema 不一致
- 拼写错误
- 数据类型不完整(Schema 中的字段未全部映射)
这些问题会在多个组件中产生连锁反应。自动生成 GraphQL 操作的类型可以显著提升开发体验和系统稳定性。
使用CodeGen后,无需再手动维护 TypeScript 类型
前端开发者将获得:
- 实时更新的类型定义
- 查询、变更、订阅的自动补全
- 更少的样板代码(如自动生成 React hooks)
-
安装依赖:
1
2
3
4
5
6
 npm i graphql
 npm i -D typescript
 npm i -D @graphql-codegen/cli
 npm i -D @graphql-codegen/typescript
 npm i -D @graphql-codegen/typescript-operations
 npm i -D @graphql-codegen/typescript-apollo-angular
-
在根目录下生成
codegen.ts文件1 2 3 4 5 6 7 8 9 10 11 12 13
import type { CodegenConfig } from '@graphql-codegen/cli'; const config: CodegenConfig = { schema: 'http://localhost:4000/graphql', documents: 'src/gql/*.graphql', generates: { './src/gql/generated.ts': { plugins: ['typescript', 'typescript-operations', 'typescript-apollo-angular'] } } }; export default config; -
将我们在Apollo Sandbox里生成的Query语句保存在
src\gql\hello.graphql文件中1 2 3 4 5
query SayHello { sayHello { result } } -
更新
package.json,添加generate命令1 2 3 4 5
{ "scripts": { "generate": "graphql-codegen" } } -
将
TypeGraphQL章节中的Server跑起来, 使用以下命令来自动生成generated.ts文件1
npm run generate
-
我们看一下生成的
generated.ts文件1 2 3 4 5 6 7 8 9 10 11 12 13 14 15 16 17 18 19 20 21 22 23 24 25 26 27 28 29 30 31
export type Hello = { __typename?: 'Hello'; result: Scalars['String']['output']; }; export type Query = { __typename?: 'Query'; sayHello: Hello; }; export type SayHelloQuery = { __typename?: 'Query', sayHello: { __typename?: 'Hello', result: string } }; export const SayHelloDocument = gql` query SayHello { sayHello { result } } `; @Injectable({ providedIn: 'root' }) export class SayHelloGQL extends Apollo.Query<SayHelloQuery, SayHelloQueryVariables> { document = SayHelloDocument; constructor(apollo: Apollo.Apollo) { super(apollo); } }CodeGen自动帮我们生成了SayHelloGQL和SayHelloQuery -
更新source code 直接引用它俩
1
2
3
4
5
6
7
8
9
10
11
12
13
14
15
16
17
18
19
20
21
22
23
24
25
 // BE SURE TO USE Observable from `rxjs` and not from `@apollo/client/core` when using map
 import { Observable } from 'rxjs';
 import { map} from 'rxjs/operators';
 import { SayHelloGQL, SayHelloQuery } from '../gql/generated';

 @Component({
     /* … */
 })
 export class AppComponent{
     title = 'client';
     data: any
     loading = true;
     error: any;
     sayHelloQuery: Observable<SayHelloQuery['sayHello']>;

     constructor(private readonly sayHelloGQL: SayHelloGQL) {
         this.sayHelloQuery = sayHelloGQL.watch().valueChanges.pipe(
             map(result => result.data.sayHello)
         );
         this.sayHelloQuery.subscribe(result => {
             this.data = result.result;
             this.loading = false;
         });
     }
 }
看起来好像更麻烦了是不,在我们的Hello Demo里确实是画蛇添足,但如果我们Server端的schema复杂起来,不再是
1
2
3
Hello {
    result
}
而是更加复杂的,比如:
1
2
3
4
5
6
7
8
9
10
Posts {
  id
  title
  author {
    id
    firstName
    lastName
  }
  ...
}
当我们从Server端查询到这样的数据,如果我们想使用它,那在Client端,我们需要定义接口
1
2
3
4
5
6
7
8
9
10
interface Post {
    id: string
    title: string
    author?: {
        id: string
        firstName: string
        lastName: string
    }
    ...
}
这个接口是不是和Server端Schema很相似。如果Server schema里有成百上千个属性呢?使用CodeGen能自动生成这些接口,简化了Client端的工作。
Reference
使用GraphQL和Apollo构建Angular ToDo应用
GraphQL真香入门教程
自动生成GraphQL接口文件的步骤
GraphQL 的 正确打开方式 (apollo-client前戏)
apollo-client 和 apollo-server的正确打开方式
Apollo_Angular_GraphQl_Start
Angular Integration with GraphQL: Complete Guide to Setup and Usage
Complete guide to GraphQL in Angular
Apollo Server
Apollo Client
TypeGraphQL
TypeGraphQL examples
TypeScript + GraphQL = TypeGraphQL
TypeScript 与 GraphQL 的结合应用
如何使用TypeScript和GraphQL开发应用
GraphQL:深入理解GraphQL订阅功能
GraphQL-WebSocket
Apollo Angular
CodeGen Getting start
CodeGen Angular
